CAGED System Mastery
Part 1: Introduction to the CAGED System
What is the CAGED System?
The CAGED System is a powerful method for understanding and navigating the guitar fretboard.
It’s named after five open chord shapes: C, A, G, E, and D.
These shapes serve as the foundation for finding and playing any major or minor chord across the entire neck of the guitar.
Why is it called “CAGED”?
The name “CAGED” comes from the sequence of open chord shapes that you already know:
1. C – The open C major chord shape.
2. A – The open A major chord shape.
3. G – The open G major chord shape.
4. E – The open E major chord shape.
5. D – The open D major chord shape.
These shapes are not just chord voicings; they’re visual and structural tools that show us how chords connect and overlap across the fretboard.
By learning how these shapes repeat in a sequence up the neck, you can unlock the ability to play chords, scales, and arpeggios in any key and position.
Why is the CAGED System Important?
1. Fretboard Mastery:
The CAGED System helps you map the guitar neck so you can visualize how notes and chords are connected across the strings.
2. Chord Flexibility:
You’ll learn how to play the same chord in multiple positions, giving you flexibility to adapt to different musical contexts.
3. Improvisation and Creativity:
The system serves as a framework for improvising and creating melodic lines, as it ties together chords and scales.
4. Consistency Across Chord Types:
Once you understand the major chord shapes, you can apply the same system to minor chords, seventh chords, and more.
What Will You Learn?
In this lesson, we’ll focus on:
• Identifying and using the five major chord shapes in the CAGED System.
• Modifying these shapes to play minor chords.
• Connecting the shapes to play chords fluidly up and down the fretboard.
By the end of this course, you’ll have the tools to confidently find and play any major or minor chord in multiple positions across the fretboard.
Let’s dive into the first step: understanding the CAGED chord shapes and how they connect!
Part 2: The C Shape in the CAGED System
Step 1: Understanding the Open C Chord
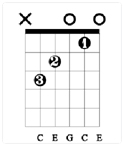
The C shape begins with the open C major chord.
Here’s how you play it:
• Place your ring finger (3) on the 3rd fret of the 5th string (C note, root).
• Place your middle finger (2) on the 2nd fret of the 4th string (E note).
• Place your index finger (1) on the 1st fret of the 2nd string (C note).
• Strum from the 5th string down, leaving the 3rd and 1st strings open.
This is your starting shape for the C major chord.
Step 2: Transposing the C Shape
To move this shape up the fretboard, you’ll need to “barre” with your index finger to replace the open strings.
This allows you to transpose the shape and play it in different keys.
• Use your index finger (1) as a barre across all the strings beneath the root note.
• Your other fingers maintain the same shape as the open C chord, relative to the barre.
• The name of the chord depends on where the root note (on the 5th string) is located.
Step 3: Example: D Major Chord
Let’s use this method to play a D major chord using the C shape:
1. Find the root: The root note of the chord (on the 5th string) determines the chord’s name. The note D is on the 5th fret of the 5th string.
2. Place the shape:
• Barre the 5th fret with your index finger (1).
• Position your other fingers as if you were playing an open C chord, relative to the barre:
• Place your ring finger (3) on the 7th fret of the 5th string.
• Place your middle finger (2) on the 6th fret of the 4th string.
• Place your pinky finger (4) on the 7th fret of the 2nd string.
3. Strum from the 5th string down to form a D major chord using the C shape.
Tips for Practicing
1. Root Awareness: Always identify the root note on the 5th string to ensure you’re naming the chord correctly.
2. Shape Consistency: Focus on keeping the shape intact as you slide it up and down the neck.
3. Precision: Ensure your barre is clean and pressing all the strings needed for the shape to ring clearly.
Next, we’ll explore the A shape, which connects directly to the C shape and allows you to expand your understanding of the fretboard.
Part 3: The A Shape in the CAGED System
Step 1: Understanding the Open A Chord
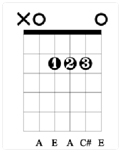
The A shape starts with the familiar open A major chord. Here’s how you play it:
• Place your index finger (1) on the 2nd fret of the 4th string (E note).
• Place your middle finger (2) on the 2nd fret of the 3rd string (A note).
• Place your ring finger (3) on the 2nd fret of the 2nd string (C# note).
• Strum from the 5th string down, letting the open A string (5th) and high E string (1st) ring out.
This is your starting point for the A major chord.
Step 2: Transposing the A Shape
To transpose the A shape up the fretboard, we use a barre to replace the open strings:
• Use your index finger (1) to barre all the strings beneath the root note.
• The other fingers maintain the A shape relative to the barre.
• The root note is found on the 5th string, determining the chord name.
Step 3: Example: C Major Chord
Let’s play a C major chord using the A shape:
1. Find the root: Locate the note C on the 5th string, which is on the 3rd fret.
2. Place the shape:
• Barre the 3rd fret with your index finger (1).
• Use your ring finger (3) (or a combination of fingers) to fret the 5th fret of the 4th, 3rd, and 2nd strings.
3. Strum from the 5th string down to create a C major chord using the A shape.
Alternate Fingering for the A Shape
Some players prefer to use their ring finger (3) to flatten across the 4th, 3rd, and 2nd strings instead of using three separate fingers.
This can make transitions easier and more efficient in some cases.
Connecting the C and A Shapes
The A shape naturally follows the C shape in the CAGED sequence. For example:
• When playing a C major chord in the C shape at the 8th fret, the A shape appears just below it, starting on the 3rd fret.
• By understanding this overlap, you can smoothly transition between shapes and cover the fretboard efficiently.
Tips for Practicing
1. Root Awareness: Like with the C shape, always start by finding the root note on the 5th string.
2. Barre Cleanliness: Make sure your barre is firm and consistent, especially as you move up the neck.
3. Experiment with Fingering: Try both the flattened ring finger and individual finger positions to see what works best for you.
Next, we’ll dive into the G shape, which brings us to a new section of the fretboard and introduces a slightly more challenging chord form.
Part 4: The G Shape in the CAGED System
Step 1: Understanding the Open G Chord
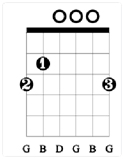
The G shape begins with the familiar open G major chord. Here’s how you play it:
• Place your middle finger (2) on the 3rd fret of the 6th string (G note, root).
• Place your index finger (1) on the 2nd fret of the 5th string (B note).
• Place your ring finger (3) on the 3rd fret of the 1st string (G note).
• Strum all six strings, allowing the open 4th (D), 3rd (G), and 2nd (B) strings to ring out.
This open position is a foundation for the G shape within the CAGED System.
Step 2: Transposing the G Shape
To move the G shape up the fretboard, you’ll need to replace the open strings with a barre:
• Use your index finger (1) to barre across the strings below the root note.
• Maintain the relative position of the other fingers to the barre to recreate the G shape.
• The root note is on the 6th string, determining the chord name.
Step 3: Example: A Major Chord
Let’s use the G shape to play an A major chord:
1. Find the root: Locate the note A on the 6th string, which is on the 5th fret.
2. Place the shape:
• Barre the 5th fret with your index finger (1).
• Position your middle finger (2) on the 7th fret of the 6th string (A root).
• Place your ring finger (3) on the 7th fret of the 1st string.
• Use your pinky (4) for additional support on the frets required for the 5th string and barre notes as needed.
3. Strum all six strings to create an A major chord using the G shape.
Challenges of the G Shape
The G shape can feel awkward at first due to its wide reach and complexity when barring. Here are some tips to overcome this:
• Practice Slowly: Break down the shape into smaller sections to ensure all notes ring clearly.
• Fretboard Familiarity: Focus on locating the root note on the 6th string to place the shape accurately.
• Simplify When Needed: If barring the full shape feels too difficult, focus on playing just the root and the top strings as a partial chord.
Connecting the G and A Shapes
The G shape naturally follows the A shape in the CAGED sequence. For example:
• When playing an A major chord using the A shape at the 5th fret, the G shape can be found further up the fretboard, starting on the 5th string root.
• This overlap helps you transition smoothly between chord shapes and expand your fretboard knowledge.
Tips for Practicing
1. Use a Metronome: Practice moving the G shape up and down the neck with a steady tempo.
2. Focus on Clarity: Ensure each note of the chord rings clearly, especially when barring.
3. Combine Shapes: Link the G shape with the previously learned C and A shapes to create smooth transitions.
Next, we’ll tackle the E shape, a versatile and powerful part of the CAGED System that connects well with the G shape.
Part 5: The E Shape in the CAGED System
Step 1: Understanding the Open E Chord
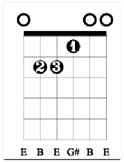
The E shape begins with the familiar open E major chord. Here’s how you play it:
• Place your middle finger (2) on the 2nd fret of the 5th string (B note).
• Place your ring finger (3) on the 2nd fret of the 4th string (E note).
• Place your index finger (1) on the 1st fret of the 3rd string (G# note).
• Strum all six strings, letting the open 6th (E), 2nd (B), and 1st (high E) strings ring out.
This open E chord forms the foundation of the E shape in the CAGED System.
Step 2: Transposing the E Shape
To transpose the E shape up the neck, you’ll use your index finger (1) as a barre to replace the open strings:
• Barre all the strings beneath the root note with your index finger.
• Maintain the relative positions of the other fingers to the barre to recreate the E shape.
• The root note is on the 6th string, determining the chord name.
Step 3: Example: G Major Chord
Let’s use the E shape to play a G major chord:
1. Find the root: Locate the note G on the 6th string, which is on the 3rd fret.
2. Place the shape:
• Barre the 3rd fret with your index finger (1).
• Place your middle finger (2) on the 5th fret of the 5th string (D note).
• Place your ring finger (3) on the 5th fret of the 4th string (G note).
• Place your pinky finger (4) on the 4th fret of the 3rd string (B note).
3. Strum all six strings to create a G major chord using the E shape.
Benefits of the E Shape
• Simplicity: The E shape is one of the most intuitive shapes to transpose, thanks to its straightforward barre form.
• Versatility: It works well for both major and minor chords (we’ll discuss the minor version later).
• Fretboard Coverage: With the root note on the 6th string, the E shape helps you cover a significant portion of the neck.
Connecting the E and G Shapes
The E shape naturally follows the G shape in the CAGED sequence. For instance:
• When playing a G major chord using the G shape at the 3rd fret, the E shape is found directly at the same position, with its root note on the 6th string.
• This connection creates a seamless transition between shapes, allowing you to visualize the fretboard as a continuous system.
Tips for Practicing
1. Start Slowly: Focus on cleanly barring all six strings and ensuring every note rings out clearly.
2. Root Note Awareness: Always identify the root note on the 6th string to accurately name the chord.
3. Smooth Transitions: Practice moving between the E shape and the previously learned C, A, and G shapes to reinforce the connections across the fretboard.
Next, we’ll explore the D shape, the final piece of the CAGED puzzle, which completes your ability to navigate the entire fretboard.
Part 6: The D Shape in the CAGED System
Step 1: Understanding the Open D Chord
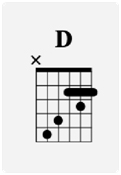
The D shape starts with the open D major chord, a small but powerful shape.
Here’s how to play it:
• Place your index finger (1) on the 2nd fret of the 3rd string (A note).
• Place your middle finger (2) on the 2nd fret of the 1st string (F# note).
• Place your ring finger (3) on the 3rd fret of the 2nd string (D note, root).
• Strum from the 4th string down, letting the open D string ring out as the bass note.
This compact chord forms the foundation of the D shape in the CAGED System.
Step 2: Transposing the D Shape
To move the D shape up the fretboard:
• Use your index finger (1) as a barre to replace the open strings.
• Keep the other fingers in the same relative positions to recreate the D shape.
• The root note is on the 2nd string, which determines the chord’s name.
Step 3: Example: G Major Chord
Let’s play a G major chord using the D shape:
1. Find the root: Locate the note G on the 2nd string, which is on the 8th fret.
2. Place the shape:
• Barre the 7th fret with your index finger (1) to replace the open strings.
• Place your middle finger (2) on the 8th fret of the 1st string.
• Place your ring finger (3) on the 9th fret of the 2nd string.
• Place your pinky finger (4) on the 9th fret of the 3rd string.
3. Strum from the 4th string down to play the G major chord using the D shape.
Challenges of the D Shape
The D shape is one of the smaller and more intricate shapes in the CAGED System. It can feel tight or cramped when moved up the neck. Here are some tips to master it:
• Focus on Precision: Ensure each finger is placed correctly to avoid muting adjacent strings.
• Root Awareness: Always locate the root note on the 2nd string to properly name the chord.
• Partial Chords: If the full shape is challenging, focus on the top three strings for a simplified version of the chord.
Connecting the D and E Shapes
The D shape follows the E shape in the CAGED sequence.
For example:
• If you’re playing a G major chord using the E shape at the 3rd fret, the D shape for G major appears higher up the neck, starting at the 7th fret.
• Visualizing this overlap strengthens your understanding of how chords flow into each other along the fretboard.
Tips for Practicing
1. Root Identification: Start with the root note on the 2nd string and build the shape around it.
2. Clean Execution: Focus on ringing out every note clearly, even as you shift the shape up and down the neck.
3. Link the Shapes: Combine the D shape with the previously learned C, A, G, and E shapes to see how they connect.
With the D shape complete, you now have the full set of tools to play any major chord across the fretboard using the CAGED System.
Up next, we’ll apply this knowledge to minor chords by modifying each of the five shapes!

Part 7: Practicing the CAGED Shapes with Chord Progressions
To truly master the CAGED System, it’s essential to practice transitioning between the shapes in real-world scenarios.
A great way to do this is by using chord progressions to explore the fretboard and reinforce the connections between shapes.
In this exercise, we’ll work with a simple progression: A major to D major.
The goal is to play these chords using the closest CAGED shapes to make the transitions smooth and efficient.
Step 1: Analyze the Chords
The chords in the progression are A major and D major. Let’s locate these chords across the fretboard using the CAGED shapes.
1. A Major: Root note on A (5th string, 12th fret) or E (6th string, 5th fret).
2. D Major: Root note on D (4th string, 7th fret) or A (5th string, 5th fret).
Step 2: Using the CAGED Shapes
Here’s how to play the progression efficiently, using shapes that are close together:
1. A Major (E Shape) at the 5th fret:
• Root note on the 6th string (A on the 5th fret).
• Play the E shape for A major.
2. D Major (A Shape) at the 5th fret:
• Root note on the 5th string (D on the 5th fret).
• Play the A shape for D major.
Step 3: Experiment with Other Shape Pairings
While the E and A shapes are close and convenient for this progression, try using other shapes to challenge yourself.
For example:
• Play A major (C Shape) at the 12th fret, then switch to D major (C Shape) at the 10th fret.
• Play A major (G Shape) at the 2nd fret, then move to D major (E Shape) at the 10th fret.
Exercise: Practice the Progression
1. Start by playing the progression A → D → A → D using one set of shapes.
2. Repeat the progression, but use a different set of shapes to explore the fretboard.
3. Gradually increase the tempo as you become more comfortable with the transitions.
Step 4: Create Your Own Progressions
To expand your practice, experiment with other common chord progressions:
• G → C → D → G
• E → A → B → E
• C → F → G → C
Focus on finding the closest CAGED shapes for each chord in the progression to minimize movement and improve efficiency.
Why This Exercise Works
This method helps you:
• Build muscle memory for each shape.
• Strengthen your ability to visualize connections across the fretboard.
• Improve your timing and transitions, crucial for real-world playing.
By regularly practicing with chord progressions, you’ll develop fluency in the CAGED System and gain confidence in navigating the fretboard seamlessly.
Part 8: The Minor Versions of the CAGED Shapes
Now that we’ve mastered the major shapes in the CAGED System, it’s time to explore their minor counterparts.
By lowering the third in each shape, we can play any minor chord across the fretboard using the same system. Let’s break it down shape by shape.
The C Minor Shape
1. Start with the open C major chord:
• Lower the E note (2nd string, 1st fret) to Eb by moving it down one fret.
2. Transposing the shape:
• As you move this shape up the neck, use your index finger to barre the root note on the 5th string.
• The root note (on the 5th string) determines the chord name.
Example: D minor
• Root on the 5th string, 5th fret (D note).
• Play the C minor shape with the barre.
The A Minor Shape
1. Start with the open A minor chord:
• Place your fingers as follows:
• 2nd fret on the 4th string.
• 2nd fret on the 3rd string.
• 1st fret on the 2nd string.
2. Transposing the shape:
• Move the shape up the neck, and use your index finger to barre the root note on the
5th string.
Example: C minor
• Root on the 5th string, 3rd fret (C note).
• Play the A minor shape with the barre.
The G Minor Shape
1. Start with the open G major chord:
• Lower the B note (2nd string, open) to Bb by moving it down one fret.
2. Transposing the shape:
• Use your index finger to barre and replicate the open G minor chord higher up the neck.
• The root note is on the 6th string.
Example: A minor
• Root on the 6th string, 5th fret (A note).
• Play the G minor shape.
The E Minor Shape
1. Start with the open E minor chord:
• Place your fingers as follows:
• 2nd fret on the 5th string.
• 2nd fret on the 4th string.
2. Transposing the shape:
• Move the shape up the neck, and use your index finger to barre the root note on the 6th string.
Example: G minor
• Root on the 6th string, 3rd fret (G note).
• Play the E minor shape with the barre.
The D Minor Shape
1. Start with the open D minor chord:
• Place your fingers as follows:
• 2nd fret on the 3rd string.
• 3rd fret on the 2nd string.
• 1st fret on the 1st string.
2. Transposing the shape:
• Use your index finger to barre and replicate the open D minor chord higher up the neck.
• The root note is on the 2nd string.
Example: F minor
• Root on the 2nd string, 6th fret (F note).
• Play the D minor shape with the barre.

Practicing the Minor Shapes
1. Locate the Root:
• Start by identifying the root note for the chord you want to play.
• Match it to the corresponding CAGED shape.
2. Switch Between Major and Minor:
• Practice transitioning between major and minor versions of each shape to reinforce the concept.
3. Play Progressions:
• Incorporate minor chords into progressions (e.g., Am → Dm → Em) and play them using the closest shapes.
Tips for Mastering the Minor Shapes
• Focus on Clarity: Make sure every note in the chord rings clearly, especially when barring.
• Memorize the Root Notes: This will help you quickly find the right chord shape anywhere on the fretboard.
• Experiment with Progressions: Use progressions like Am → Gm → Fm to practice switching between the shapes smoothly.
With the minor shapes under your fingers, you now have the tools to play any major or minor chord across the entire fretboard.
Up next, we’ll dive into combining major and minor shapes with arpeggios and scales to expand your musical vocabulary!
Part 9: Next Steps and Final Thoughts
Congratulations on completing the CAGED System course!
By now, you should have a strong understanding of how to navigate the fretboard using the five major shapes and their minor counterparts.
You’ve learned how to find and play any major or minor chord in any key, and you’ve developed the skills to easily move between chords across the neck.
However, mastering the CAGED System is just the beginning.
To truly integrate this knowledge into your playing and expand your musical vocabulary, here are the next steps you can take:
1. Incorporate Chord Progressions
Now that you’ve learned the shapes, challenge yourself by incorporating them into real-world chord progressions.
Practice using different shapes for each chord, and focus on smooth transitions between them.
Experiment with common progressions such as:
• I-IV-V (C → F → G)
• ii-V-I (Dm → G → C)
• I-vi-IV-V (C → Am → F → G)
These progressions will help you internalize the CAGED shapes while enhancing your rhythm playing.
Try playing them in various keys to strengthen your fretboard knowledge.
2. Apply the Shapes to Scales and Arpeggios
The CAGED System isn’t just for chords—it’s also a great tool for scales and arpeggios.
Each CAGED shape can be connected to a scale or arpeggio pattern. For example:
• Major Scales: Learn the major scale patterns corresponding to each of the CAGED shapes.
• Minor Scales: Use the minor shapes to build minor scale patterns across the neck.
• Arpeggios: Practice playing arpeggios using the same CAGED shapes for major and minor chords.
This will help you build your improvisation skills and provide a strong foundation for lead playing.
3. Focus on Fingerboard Visualization
Now that you know the CAGED shapes, start connecting them across the fretboard.
Instead of thinking of each shape as isolated, try to see the fretboard as one continuous system.
Practice playing a chord progression using a combination of shapes and position shifts.
This will help you move around the fretboard more freely and improve your ability to visualize where each note, chord, or scale can be played.
4. Experiment with Different Musical Styles
The CAGED System is versatile and can be applied to a wide range of musical genres.
Try incorporating it into:
• Rock: Use it for rhythm and lead guitar.
• Jazz: Apply it to jazz chord voicings and improvisation.
• Blues: Experiment with major and minor pentatonic scales along the CAGED shapes.
• Funk: Work with chord stabs and syncopated rhythms using the shapes.
By applying the CAGED System to different styles, you’ll discover new ways to express yourself musically.
5. Advanced Applications
As you continue to progress, you can dive deeper into more advanced concepts such as:
• Extended Chords: Learn how to apply CAGED shapes to seventh chords, ninths, and other extended harmonies.
• Chord Substitutions: Use the system to explore chord substitutions and jazz harmony.
• Alternate Tunings: Experiment with alternate tunings while still recognizing the CAGED system in different contexts.
Final Thoughts
Mastering the CAGED System is a journey, not a destination.
Keep practicing, stay curious, and don’t be afraid to experiment.
By using the CAGED System to navigate the fretboard, you’ll unlock an entirely new way of thinking about the guitar.
Over time, you’ll become more comfortable and confident in your playing, whether you’re accompanying yourself in a band, writing your own music, or improvising in a jam session.
Thank you for completing this course!
Continue to practice, explore, and expand your knowledge of the guitar.
The possibilities are endless—keep playing, and keep pushing yourself to learn more!
